Tuesday, April 30, 2013

Directionare 2% din impozitul pe venit

Puteti contribui printr-o donatie pentru a sustine activitatile
Eco Ruralis - in sprijinul fermierilor ecologici si traditionali


Datele de identificare fiscala:
Denumire entitate non-profit: Eco Ruralis - in sprijinul fermierilor ecologici si traditionali
Cod de Inregistrare Fiscala (CIF): 25507050
Cod IBAN (cont RON): RO32RZBR0000060011834302
Banca: Raiffeisen Bank Cluj - Agentia Horea

2%

Prin intermediul prevederii 2% din Codul Fiscal, contribuabilii persoane fizice au posibilitatea sa directioneze 2% din impozitul pe venit catre o entitate nonprofit infiintata conform ordonantei 26/2000 cu privire la asociatii si fundatii.

Pentru directionarea a 2% din impozitul pe venit catre Eco Ruralis - in sprijinul fermierilor ecologici si traditionali, folositi datele fiscale mentionate mai sus.

Mai multe informatii despre prevederea 2% sunt indicate pe site-ul: www.doilasuta.ro realizat de Asociatia pentru Relatii Comunitare.

Termenul pentru depunerea declaratiilor pentru veniturile realizate in anul 2012 este 15.05.2013.
Formularul se depune la administraţia fiscală de care aparţine contribuabilul, în două exemplare.

Saturday, April 13, 2013

Fata de perna steluta in 5 colturi


Five-Point Star

Materials: Any weight yarn and suitable needles; tapestry needle.
Segment 1: Use the knitted method to CO 21 sts. Set-up row: (WS) Purl.
 Row 1: (RS) Sl 1 with yarn in back (wyb), k8, sssk, knit to end—19 sts rem.
 Row 2 and all WS rows: Sl 1 with yarn in front (wyf), purl to end.
 Row 3: Sl 1 wyb, k7, sssk, knit to end—17 sts rem. 
 Row 5: Sl 1 wyb, k6, sssk, knit to end—15 sts rem. 
Row 7: Sl 1 wyb, k5, sssk, knit to end—13 sts rem. 
Row 9: Sl 1 wyb, k4, sssk, knit to end—11 sts rem. 
Row 11: Sl 1 wyb, k3, sssk, knit to end—9 sts rem.
Row 13: Sl 1 wyb, k2, sssk, knit to end—7 sts rem. 
Row 15: Sl 1 wyb, k1, sssk, knit to end—5 sts rem. 
Row 17: Sl 1 wyb, sssk, k1—3 sts rem.Row 19: Sssk—1 st rem. 
Segment 2:*With RS facing and 1 st on right needle, pick up and knit 10 more sts down slipped-st selvedge of lefthand side of Segment 1, ending at corner. Turn and use the knitted method to CO 21 sts—32 sts total. Set-up row: (WS) P20, p2tog, turn—1 st dec’d. On WS rows, you will join Segment 2 with the picked-up sts along Segment 1 by working p2tog over last st of Segment 2 and next picked-up st.  
Row 1: (RS) Sl 1 wyb, k8, sssk, knit to end—2 sts dec’d. 
Row 2 and all WS rows: Sl 1 wyf, purl to 1 st before turning point on previous row (slipped edge st of Segment 2), p2tog (edge st and foll picked-up st), turn.
Row 3: Sl 1 wyb, k7, sssk, knit to end. 
Row 5: Sl 1 wyb, k6, sssk, knit to end. 
Row 7: Sl 1 wyb, k5, sssk, knit to end. 
Row 9: Sl 1 wyb, k4, sssk, knit to end.
Row 11: Sl 1 wyb, k3, sssk, knit to end.
Row 13: Sl 1 wyb, k2, sssk, knit to end. 
Row 15: Sl 1 wyb, k1, sssk, knit to end. 
Row 17: Sl 1 wyb, sssk, k1.
 Row 19: Sssk—2 sts rem: 1 st for Segment 2 and 1 st for Segment 1. 
Segments 3, 4, and 5:Rep from * for Segments 3, 4, and 5—after each segment you will have 1 more final st rem. 5 sts rem when all segments are complete. Break yarn and thread tail through rem 5 sts and cinch to close. Sew seam between Segment 5 and Segment 1. Weave in ends and pin out to block.

Fete de perne crosetate

Ch 2
Rnd 1 – work 12dc’s into 2nd ch from hk, join. (12)
Rnd 2 – work 2dc’s into each st, join. (24)
Rnd 3 – (dc in next, 2dc in next) around, join. (36)
Rnd 4 – (dc in next 2, 2dc in next) around, join. (48)
Rnd 5 – (dc in next 3, 2dc in next) around, join. (60)
Rnd 6 – (dc in next 4, 2dc in next) around, join. (72)
Rnd 7 – (dc in next 5, 2dc in next) around, join. (84)
Rnd 8 – (dc in next 6, 2dc in next) around, join. (96)
Rnd 9 – (dc in next 7, 2dc in next) around, join. (108)
Rnd 10 – (dc in next 8, 2dc in next) around, join. (120)
Rnd 11 – (dc in next 9, 2dc in next) around, join. (132)
Rnd 12 through Rnd 13 – dc in each st around, join. (132)
Rnd 14 – (dc in next 9, dc2tog) around, join. (120)
Rnd 15 – (dc in next 8, dc2tog) around, join. (108)
Rnd 16 – (dc in next 7, dc2tog) around, join. (96)
Rnd 17 – (dc in next 6, dc2tog) around, join. (84)
Rnd 18 – (dc in next 5, dc2tog) around, join. (72)
Rnd 19 – (dc in next 4, dc2tog) around, join. (60)
Fasten off and Weave in ends.

Insert your pillow and keep decreasing by 12 to close the pillow.

Creatii din lana


Click pe pozele de mai jos pt tutoriale


Alte creatii


Lana 100% gasiti aici


Thursday, April 11, 2013

Fata de perna margareta

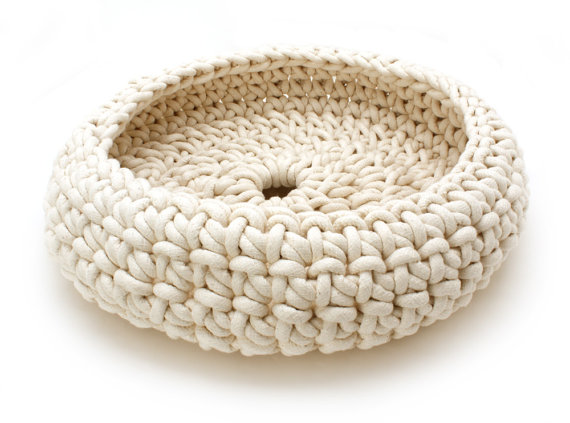
Size: Approximately 14½ inches in diameter
Materials Required:
AMERICAN THREAD "AUNT LYDIA'S"
HEAVY RUG YARN
4—70 yd. skeins White
1—70 yd. skein Orange
Aluminum Crochet Hook Size H OR ANY SIZE HOOK WHICH WILL RESULT IN STITCH GAUGE BELOW
½ yd. Lining Material
Shredded Foam Rubber or Kapok
GAUGE: 5 sts and 4 rows =2 inches
CENTER: With Orange ch 2, 8 s c in 2nd st from hook.  
2nd ROUND: Ch 3, sl st in front loop of next s c, repeat from beg 7 times (8 loops).
 3rd ROUND: 2 s c in back loop of each s c (16 s c).
 4th ROUND: Repeat 2nd round, (16 loops), cut yarn.
5th ROUND: At­tach White working in back loop of sts, ch 3, d c in same st, * ch 1, 2 d c in next st, repeat from * to end of round, ch 1, join in top of ch 3 (16 shells).
 6th ROUND: Ch 4, 1 d c between ch 3 and d c of 1st shell, * 1 d c, ch 1, 1 d c be­tween 2 d c of next shell, repeat from * to end of round, join to correspond.  
7th ROUND: SL st to ch 1 space, ch 3, 1 d c, ch 1, 2 d c in same space of 1st shell, * 2 d c, ch 1, 2 d c in ch 1 space of next shell, repeat from * to end of round, join to correspond.
8th and 9th ROUNDS: SL st to ch 1 space, ch 3, 1 d c, ch 1, 2 d c in ch 1 space, * ch 1, 2 d c, ch 1, 2 d c in next ch 1 space, repeat from * to end of round, ch 1, join.
10th ROUND: SL st to ch 1 space, ch 3, 2 d c, ch 1, 3 d c in next ch 1 space, * 3 d c, ch 1, 3 d c in center of next shell, repeat from * to end of round, join.
 11th ROUND: SL st to ch 1 space, ch 3, 2 d c, ch 1, 3 d c in same space, ch 1, * 3 d c, ch 1, 3 d c in center of next shell, ch 1, re­peat from * to end of round, join.  
12th ROUND: SL st to ch 1 space, ch 3, 2 d c, ch 2, 3 d c in same space, * ch 2, 3 d c, ch 2, 3 d c in center of next shell, repeat from * to end of round, ch 2, join, cut yarn.
Attach 2 strands White in 1st d c of any shell, * sl st in back loop of each st across top of shell, ch 1, sl st under each previous row between shells working ch 1 between each sl st down to 4th round of center ch 1, join in base of 1st shell round, turn. Ch 1, sl st, ch 1 in same rounds to top, repeat from * to end of round, join, cut yarn. (The ch 1, sl st under each round forms ridge between petals.)
BACK: With White work 1 section same as pillow section of Pansy. Finish same as Pansy Pillow.
POMPON: Wind Orange 50 times over a 4 inch cardboard, tie in center, cut and trim. Sew in place to center.

Saturday, April 6, 2013

4 Tutoriale covoare handmade de lana


                                   Lana 100% de calitate  gasiti aici
Pentru realizarea covoarelor de mai jos se pot utiliza 2, 3 sau 4 fire duble
  (adica firul dublu pus in 2, 3 sau 4) depinde de grosimea dorita.
 
Firul dublu pus in doua                  Firul dublu pus in 4 
comparativ cu grosimea unui covor de lana 100%

Firul dublu pus in 4 lucrat cu crostea de 10. 
Recomand sa se lucreze cu 3 fire duble pentru croseta 10, si nu cu 4.


1. Cum sa crosetezi un covor oval (double stich)


    • 1Make a slipknot and insert the crochet hook into the loop.
    • 2Chain 25.
      A chain of 25 gives you a beginning oval that is 8 inches wide (see photo). You can vary the length of the beginning chain to vary the overall appearance of the oval. A wide beginning chain will give you a wide oval. A short beginning chain will yield an oval that is more round in appearance. The width increases approximately 1 inch for every 3 chain stitches.
    • 3Beginning in the 4th chain from the crochet hook, work back across the chain using the double crochet stitch.
    • 4In most crochet projects, this step would require that the work be turned. Do not turn the work but continue to double crochet around the side and bottom of the first row of stitches. Continue working in a circular pattern around the outside of the oval, never turning the piece.
    • 5When crocheting around the sides of the oval, "increase stitch" three times on each side. To increase stitch, double crochet twice in a single stitch of the previous row. The result is two double crochets occurring in one double crochet from the last row. Increase stitching allows the oval to expand and grow in stitches as the oval gets bigger. It will also keep the oval from bunching and gathering.
    • 6After reaching the 5th row, increase stitch 6 times around each edge of the oval, for a total of 12 increase stitches in each round. Spread the oval out occasionally on a flat surface to ensure it is not gathering.
    • 2. Cum sa crosetezi un covor oval (Single stich)


      1Crochet a chain that will be the center of your oval rug. The rest of the rug is worked around this center line. See Resources if you need to brush up on your chain stitch, single crochet stitch or slip stitch, which are used for this project.
      2Single crochet three times in the second chain from the hook, then single crochet once in each chain across to the last chain stitch. 
      3Make three single crochet in the last chain, but do not turn. 
      4Continue working around the opposite side of the starting chain, and single crochet in each chain back to the starting chain. 
      5Do not join rounds. Place a stitch marker or bobby pin on the first stitch to mark the start of the round. 
      6Make two single crochet in each of the next three stitches to increase around the curved edge of the rug. Then crochet down the length of the rug to the opposite end and make two single crochet in each of the three stitches in the end. Crochet back up the opposite side to complete the round. 
      7Continue in the pattern outlined in step 6, increasing three stitches evenly spaced in the ends of the rug. You evenly space them by skipping one more stitch between the increases than the round before. For example, in the next round, you'll skip one stitch between each increase, then you'll skip two stitches between each increase in the round after that, and skip three in the next round. 
      8Join with a slip stitch in the first stitch when the rug is the size you want, and you are ready to fasten off. Chain one and cut the yarn, leaving a six inch tail for weaving in with the yarn needle.


      3. Covoare innodate handmade


       Scula de innodare  Pret: 30 Ron
      (produs disponibil)


      1Select a piece of yarn in a color that corresponds to the printed colors on the canvas.
      2Fold the yarn piece in half around the latch hook, holding the yarn piece in place below the movable latch of the latch hook. 
      3Insert the latch hook into a canvas hole and then back up out of the canvas hole immediately above the first hole. Push the latch hook up so the top portion with the movable latch extends out of the top hole in the canvas with the folded yarn piece wrapped around the latch hook below the bottom canvas hole. 
      4Open the latch of the latch hook and wrap the yarn over the latch hook with the two ends of the yarn piece in the open latch area of the latch hook. 
      5Pull the latch hook carefully down through the holes in the canvas. As you pull the latch hook down, the latch will close around the yarn. Continue pulling the latch hook through the holes. The pulling movement will tie the yarn piece around the canvas. 
      6Remove the latch hook from the canvas and tighten the yarn piece by pulling the ends gently. 
      7Repeat this process to attach the yarn pieces to the canvas, following the color pattern printed on the canvas.

      Exemple de covoare innodate


      4. POM-POM Rugs

      Aici gasiti un video despre cum sa faceti pom-poms fara dispozitive cumparate

      Pe youtube gasiti videoclipuri clare care va arata cum sa faceti pom-poms fara dispozitive scumpe, cum se fac covoarele innodate, sau cum se croseteaza covoarele ovale.

Postări populare

Total Pageviews